My hands and wrists are hurting - the parts are quite heavy and it's too much 'turning' in this entrelac technique. I need to learn to knit backwards.
Anyway, it's Joining Time !
All other problems I had seam to fade away as, at this stage, the pattern only says : join the parts together :).
I am not going to complain again about the pattern, as it definitely has a good part as well: it does force you into thinking a lot.
I've rejected the idea of closing triangles from the start, so I needed to come up with something else, more intelligent eventually.
And this something else needs to be a seamlessly method!
I started with a few hours of staring at both parts lying flat on the table, trying to fit them together in different ways. Finally enlightenment struck.
You want to find out the result, don't you?
Well, in this case send me an email to enroll in my knitting class or simply pay a fee for written instructions.
Sorry, just joking :).
Right, stay tuned. Here it is what I've noticed:
- If you end up both parts on the same side ( WS or RS ), you'll be able to get them together perfectly like this, the open stitches facing each other and the edges being parallel with each other.
 Well - it looks OK but actually it isn't: as the blocks are suppose to be oriented against each other and not parallel with each other!
- But, if you knit one more row for the front part, which was good anyway as it's going to push the back a bit down, then you get the blocks facing in the right direction: against each other.
Now, try to get the parts together again and you'll notice, (sh..t), they don't fit anymore!
Don't despair - what you can do to get them to interlace is to shift one of the parts slightly to the right or to the left - your choice. Just make sure you are shifting the other side symmetrically. I've decided to shift the front in a kind of inner position, the back part end triangles covering the edge of the front on both sides.
You will need to work an extra triangle at one of the edges - but this is easy to figure out.
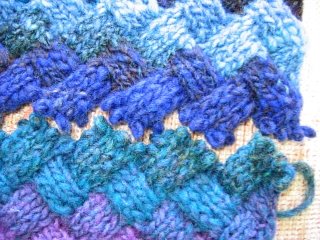
See image.

So, now it's a case that the blocks are against each other, as in normal entrelac, and you have to join four live stitches with a block edge.
My method is quite simple and worked very well - it might be that there are other better ways.
What I did was to pick up four stitches from the edge of the block and get them alternatively on one single needle, together with the live stitches : one live stitch, one picked-up, one live stitch, one picked-up etc. You'll end up with 8 stitches and all you have to do is work them on the WS , 4 times (k2tog). The result is 4 stitches.
Just continue like this for each block. You might need to 'k2tog through the back' on some blocks - decide this by checking on the RS that the picked up stitches don't get twisted after k2tog.
Turn at the end of the row and cast-off all stitches. All this is happening on the WS, right?
Done,that's all.
You will end up with a kind of zig-zag seam on the WS, but it's just making the shoulders to look a bit higher.
I am really proud about the result - there is no way you can see any difference between the knitted rows and the joined ones.
...Sleeves next !

1 comment:
My brain fried looking at how you did that. I can see now that you don't need the directions for the Japanese entrelac sweater. I made a hat once and still don't get it.
Post a Comment